Wednesday, August 31, 2011

The Terrible Twos are on their way

Let's talk about this kid for a minute.

Even though he's not quite two yet, he is sure working on fulfilling the stereotype. Clearly one of his older friends slipped him a copy of How to Lose Friends and Alienate Your Mother: The Two-Year-Old's Social Guide because he has really been on one lately.

Take this morning for example.

Well, let's back up.

Last week Logan woke up early enough to see Tyson before he goes to work. And Tyson would usually get him out of his crib and start his breakfast since he's up anyway (it goes without saying that I was not up yet - Tyson leaves for work at 7 people!). I would eventually meet them downstairs and start the day with them, puffy eyes and all.

Well this week Logan has been waking up after Tyson is already gone. Like 7:01 when the garage door opens (master planning right there putting the baby's room above the garage) and he is mad when I show up to get him out of his crib.

So mad that he would rather stay in his crib than have the likes of me getting him out. Usually I pretend to leave and that makes him panic and then he'll let me pick him up.

Not today.

Today he did his usual scream and back away trick when I approached so I left the room. And he didn't care. No screaming or crying. So I went back in and tried to pick him up again. Fail.

At that point there was nothing to do but go downstairs, have some s'more cups for breakfast (you would do it too if they were sitting on your counter from your latest batch and there was no one around to beg them off you) and see if my blog made another 30 cents.

Oh sure I tried going upstairs every once in a while to get him out, usually when he would start to cry but with no luck. I even pulled him out of the crib once and set him on the floor but he went running back and clutched at the bars. So I put him back in and went downstairs again.

I even cleaned a toilet in between attempts.

I even did my clown-like version of if you're happy and you know it stomp your feet. He joined in on the foot stomping but he was not happy.

I even offered cars, movies, and cereal as a bribe.

Eventually, an hour later, he decided I was worthy/dad wasn't coming and reluctantly allowed me to carry him downstairs, serve him the breakfast of his choice, and put on the movie of his choice.

Lucky me.

Logan's all about equal parental mistreatment though. At bedtime he only wants me around. Too bad it's Tyson's turn for bath tonight.

Lucky Tyson.

Monday, August 29, 2011

Pinterest Bonus round!


My friend Kelly showed me this on her pinterest and I linked it immediately because I HAD TO HAVE IT.

I wanted it in the playroom I'm creating for Logan, stat.

I used the advice from Unsimple Living and grabbed a box of 64 crayons plus a box of 24 crayons so I could sub out the blacks, grays, and browns. I wanted this art to be all bright colors baby!

I wasn't sure what size canvas to buy so I got one that was 24" by 30". For that size I would recommend buying more crayons than what I had. Mine didn't end up going as close to the edge of the canvas as I wanted but I was ready to craft so minor details like not enough supplies wasn't going to stop me.

I started by laying out the crayons in the order I wanted them, and then hot glued them with high heat across the canvas.
 Um, can you guess what brand I used?

I did this during craft day and although this was the easy part we were holding our breath like I was performing brain surgery.

After I got them glued down I set the canvas outside in the sun to try and soften the crayons a little bit. 

Once they started to sweat I got my blow drier out and used the lowest speed with the hottest temperature to melt the crayons.

I could not even believe how fast it started to work. Within seconds the crayon started to drip down the canvas. 

Wahoo! I would have started dancing if I didn't need to keep melting crayons.

Once the melting began it went fast. Wax was pouring out of some of these paper tubes. 

Don't you love these colors? I love them! Love the colors! Love the blow drier! Love the world!!!

It was around here that I had the unfortunate incident of bumping the melted wax with the end of the blow drier. CURSES! Thank goodness all it took to fix that little dent was 2 more seconds of hot air.

But then that blob of pinky/purple crayon dripped off the end of my blow drier into the green area.
CURSES!
AND JUST WHEN THINGS WERE GOING SO WELL.

Always quit while you're ahead, friends. Just do it.

So I hoped for the best and scraped off the suicidal crayon then painted over the mark it left with a bit of white paint.

You can't even tell, can you?

Rah Rah sis-boom-bah. I'm not even sure why I loved this project so much (other than that it's awesome) but I do. I totally have plans to make a couple smaller melty crayon canvases so I can have a collection on the wall. And I'll need frames for them all. And of course I'll need to actually hang them.

Why is that always the hardest part?

This room is gonna be so awesome when I'm done that I'm not even gonna let Logan play in it.

True story. 

It will be a shrine to me and my craftiness. 

The skinny: Well, if you haven't figured it out yet I loved this project. If you do it be sure to have your blow drier on its lowest setting otherwise the crayon will splatter. Unless that's the look you're going for of course. This is also another great way to get inexpensive wall art. I think the whole thing cost me about $17. 

Well that officially wraps up pinterest week. Whew! I have to say it was pretty fun though, and I will probably take the suggestions of others and do a tutorial on something once a week. It just won't always be pinterest. I already have more projects in mind for the playroom... 

:)

Sunday, August 28, 2011

Pinterest 7: Toilet paper roll art


Oooohhhhh myyyyyy GOODNESS this one took forever!

Man.

I've even made toilet paper wall art before, you'd think I would learned my lesson. There it is, in a bathroom. It seemed appropriate at the time. 
That one too forever too, mostly because I was dumb and painted it by hand with a junky paintbrush after I had glued it all together. There are a lot of nooks and crannies in those things, let me tell you. 

But I wanted something fancier. And as close to free as possible so I bought a few skinny sticks of balsa wood at the craft store and gathered up all the paper towel and toilet paper rolls that I had been stashing in preparation for this. 

I used the balsa as the frame for my art, cutting it with a craft knife thing.
 Then, for the curly parts I cut the toilet paper roll once lengthwise and then cut strips roughly the same depth as the wood width wise. For the straight pieces I cut a paper towel roll into strips length wise and for the pointy ended oval shape I pressed a toilet paper roll flat and cut strips width wise without cutting length wise first. 

Oh gosh. That seemed really confusing.

But... I guess I'm just going to leave it? Go see what Suzy did if you're confused. I think she explained it better. Or you could always ask me of course. No shame in that, we're all friends here. 

Anyway, then I came to the really hard part. 
Coming up with a design.
 I didn't want to copy anyone else's work so I was trying to come up with my own look that wasn't totally lame. 

That was the part that took the longest if I'm being honest. Sometimes the ideas do not flow. 
 But things eventually started to come together and a short million hours later I was about done and hadn't taken any more pictures.

Sorry about that.

By the way, I had plans to use a tacky glue but after 30 seconds I realized I wasn't going to be patient enough to wait for it to dry. So I busted out the glue gun and went with the finger burning method instead. I do think that if you have the patience a different glue would probably hold it better. My project hasn't fallen apart yet but I used hot glue on the ones in the bathroom and I had to re-glue some spots before I even hung them up.

However you choose to do it, eventually you'll be ready to paint.
I used an oil rubbed bronze spray paint that I had heard other bloggers raving about. Plus it was on sale, so yeah, that made it my first choice. 

Da dada da da daaaaaaaaaaaa! Picture me singing that in a triumphant way.

If you try and take a picture, or even look at this straight on, it creates an optical illusion that makes you feel like you have 20/200 vision (bad).

Guess that would be why you always see pictures of this stuff from the side.

 So if you make this I guess I would recommend putting it in a hallway or a place where people can't stand back and take a good look at it head on.

The skinny: If you want to try this I say go for it. But just know that it will take forever and when it's finished it will feel lighter than air and you will be able to crush it with your bare hands. Possibly by accident. Very fragile stuff here. 

It is a nice way to create an original piece of art for your home though, and I am always up for that. I was also surprised that it turned out this well because precision isn't really my thing and this seemed like the kind of project I would need math for. I would recommend using a ruled mat to work on. It helps make sure you do things evenly without have to whip out your ruler every five seconds.

And we're done with pinterest week!

Or are we...?

Saturday, August 27, 2011

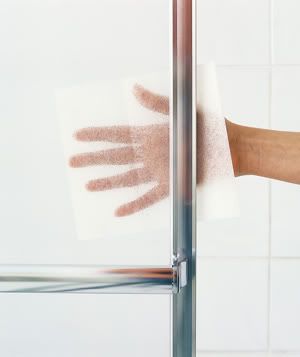
Pinterest 6: The magical powers of dryer sheets


I love this blog. She is full of great ideas that I am continuously being inspired by. On Tuesdays she does The Tuesday 10 where she highlights tons of clever ideas. Like 10 uses for dryer sheets besides putting them in the dryer. 

One of those ideas was using a damp used sheet for cleaning soap scum off your shower. 

Here's where I have a confession to make. 

I am not a great housewife. 

I like to have a clean house and I do try to keep it clean, but there are some things that I really REALLY hate cleaning. 

Like the shower. 
I would like to apologize to the world for allowing this to exist. 
These are the times I am grateful that Tyson is blind without his contacts. And that he doesn't wear them while he showers.

So, in accordance with the website, I used my dryer sheet to scrub the shower doors.
 Well this is boring.

And not user friendly. It was kinda like cleaning a glass with a wet piece of paper. It did start spreading a film of something all over that was maybe the soap scum coming off? That's the optimistic point of view anyway. When I was done I sprayed the door with water and wiped it with a microfiber towel.

In order to know if it worked any better than regular cleaner I thought I'd do a comparison with what I usually use, Clubbing Troubles (not its real name), so I cleaned one door with the sheet and one with the cleaner.
There was a difference. 
By the way I totally used one of Tyson's socks from the laundry basket (okay fine, FINE it was on the floor) to wipe dust off the baseboard before I took this picture.

Maybe it was because I didn't use Pounce (the most magical of all dryer sheets, perhaps weaved with unicorn hair?(also not its real name)) but I wasn't impressed.

Clubbing Troubles was the champ by a mile.

And did I clean the rest of the bathroom once I cleaned the doors (door)? No.
Did I even clean the rest of the shower? No. Terrible!

Stop me before I tell you how often I wash our sheets.

But at least the blog lives on.

Only one more day of the challenge. Sad!

Friday, August 26, 2011

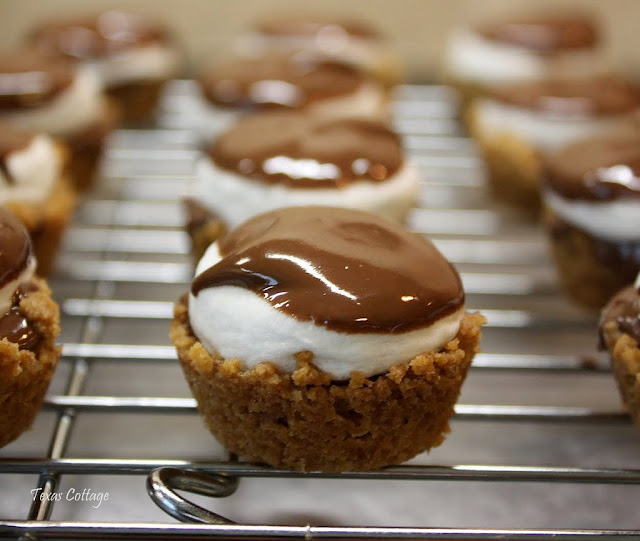
Pinterest 5: S'more cups


Um, yum. Right? All the deliciousness of a s'more without the graham cracker breakage that causes marshmallow and chocolate to drip down your chin.

And if you're like us and went camping this weekend but didn't actually get a s'more because you had to choose between s'mores and putting your baby to bed, you probably have all the supplies and all the unfulfilled cravings you need to whip these babies up.

Speaking of that trip, rare is the latrine that makes me wish I was using a bush. This outhouse even had two direct portals to h#ll "toilets" in one little room. I assume it was so you could bring a friend and hold hands to make sure nothing tried to kill you while you were in there. Delightful conversation right before sharing a recipe, eh?

On with it then.

Gather your supplies:
Marshmallows
Milk chocolate chips, or chocolate bar
Graham crackers
Powdered sugar
Butter
Mini muffin pan
Resealable bag for crushing crackers
Little "helper"

Begin by crushing one cup of graham crackers. This part was easy, all I had to do was dump the contents of Logan's carseat into a bag.
If you don't have a carseat like mine you should smash 7 whole crackers for a cup's worth.

Toss your crumbs into a bowl, then add 1/4 c. powdered sugar, and 6 Tbs melted butter.
Stir until evenly mixed.

Then press 1 Tbs of mixture into a mini muffin pan. For the first batch I used my fingers to press. On the second batch I used the back of the tablespoon. It was a duh moment. I also sprayed the pan first although I'm not sure if I needed to.
Bake in a 350 degree oven for 4-5 minutes or until edges bubble. My edges didn't actually ever bubble, presumably because when I was microwaving the butter at least a tablespoon of it splattered all over the inside of my microwave. So I may have not had enough butter to bubble. Another reason for the Pam.

Take the pan from the oven and add some chocolate chips, or a piece of chocolate bar to the bottom of the cups.

One for me, one for you...
I never understood why my mom ate plain chocolate chips when I was a kid. I always thought there were so many better candy options out there. Now I love them. Especially the fancy brands. Plus they are perfect to sneak while Logan and I are playing a game of "hide and go scare" where he closes me in the pantry and runs away and I, after an indeterminate amount of time (about as long as it takes me to destroy the evidence of a handful of chocolate chips) run out and grab him. The thrill of the steal tastes almost as good as the chocolate itself.

Hmm. The apple really doesn't fall far from the tree.
Busted.

ANYway, after you load the cups up with chocolate, cut the marshmallows in half and put one half of a marshmallow, cut side down in each cup, then put them back in the oven so the mallows can soften. 

DON'T BE LIKE ME. Remember, the pan is still hot from being in the oven. Use oven mitts.

-This PSA brought to you by Fingers Who Feel Pain

And if you're feeling brave turn on the broiler for a little extra crisp.

But try not to overdo it. Keep in mind it's hard to see smoke with the door closed even if the oven light is on.

That's sad.

But guess what! After dipping them in chocolate, the great equalizer, they all look delicious. And the truth is I liked the overcooked ones better. They had more of a roasted marshmallow flavor.

By the way, the recipe said to melt your chocolate bar/chips and dip the tops of the marshmallows in that. I had some extra almond bark left over from another treat so I melted that down and used it.
(eat meeeeeee!)


The skinny: These were the perfect treat. The recipe makes about 24 but it could easily be cut down or multiplied for as many as you want. They were also so easy to make. As you can see, they actually turned out almost exactly like the original picture which is a rare achievement for me. If you like s'mores (and you know you do) you have got to make these.

Let me know if you do ;)

------------------------------------------

Woo hoo, Jess has done it again.


She made a pico de gallo that I assume looked like this :) Hooray for pinterest!

And another! My friend Jillian made taco bowls and showcased them over at What's in Your Oven.
Don't her kids look so cute and excited to eat them? I'm gonna have to try these too.

Thursday, August 25, 2011

Pinteres 4: Yarn Balls


So... Today didn't go as planned. 

Generally, if I'm going to craft, it happens when Logan is asleep. Because really? Toddler + crafting, need I say more?

So I had planned to do the last couple steps of these yarn balls during his nap today. But then of course, Logan had a different plan and decided he would rather take a header out of his crib instead of a nap. Which meant that (long story short) he didn't end up getting a nap today. And Tyson and I were just talking about how good he was to not try and climb out of his crib, ha! Clearly we failed to knock on wood.

So my craft plan sorta fell apart and I didn't get to display them the way I wanted to but they are done. 

And my nails are chipping which has severely decreased my mojo. Perhaps like Samson and his hair?

Anyway, on to the tutorial!

First you need some balloons. I wanted different sized balls so I got the big punch balloons, some 12 inch and some 7 inch latex ones.

These are the punch balls. It took me about 2 seconds to realize we needed the pump to blow these up. On the other hand it took us about 10 minutes to tie the end off according to their directions.

Next you'll want to gather the yarn you'd like to use and make your paper mache.
I used the same recipe that Key to Flow used which is:
Mix 2 cups water and 1/2 cup flour in a bowl.
Stir to reduce lumps.
Boil 2 cups water in a saucepan then add the water/flour mixture and bring to a boil again.
Remove from heat and add 3 tablespoons sugar.
Let cool.

I made 5 yarn balls and I used every last drop of the paste. 

Dip your yarn into the paste and let it get really saturated. You'll need to find a good method for you to pull the extra paste off the yarn and wrap it around the balloon.

No matter what you do though you will feel like Gawky McAwkwardness.

It's a little tricky and super messy. But do the best you can to wrap the yarn around the balloon.

It really is easier if you put lots of yarn in the paste, then strip off the extra and have a bunch of wet yarn laid out to wrap around the balloon.


Once you've got the balloon wrapped the way you want it, ask your husband to cut the yarn since your hands are covered in goop, then rig up a drying station.

Oops, a drying station in a place where your child can't play punching bag with all your hard work. 

When the yarn is dry (at least a 24 hour wait) you'll need to work the yarn off the balloon before slowly deflating it. 

It was approximately a billion times harder to get the yarn off the punch balls than off the regular balloons. I had no idea. It was the difference between pulling each string off individually vs. just tapping the balloon to release several strings at once. 
 But I wanted that big round ball look and if I've learned anything during my crafting phase of life, it's that it's totally worth extra effort to get what you really want. Don't waste your time doing something you're not gonna like as much.

And here they are! I have plans to hang them but I haven't been able to yet. I'll show you when I do!

Extra bonus, you've got your wart balloons already done for Halloween!
'Cause that's totally a thing.

The skinny: This craft was messy. But once I got a rhythm going I was able to crank out the goop covered balloons pretty fast. I probably wouldn't do this again but I admit my mind has been churning with other ideas for paper mache. I am 90% sure I'll be making a pinata for Logan's 3rd birthday. I'm not ready to deal with that this year. 

Plus again, and you know I love this, it was a cheap project. All I had to buy were the balloons and I was planning on getting some for Logan's birthday anyway. Definitely worth trying once. 

---------------------------------------

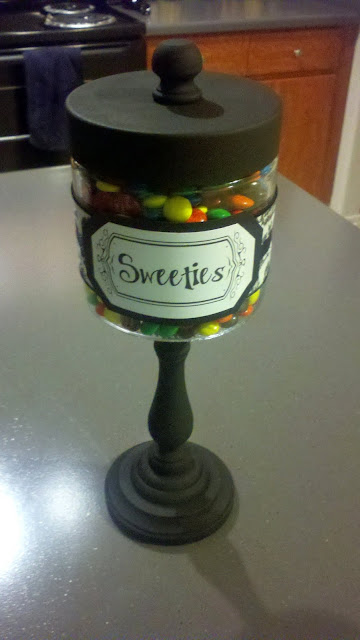
We've got another project to show! Another one of my darling cousins, Amy, made this adorable pinterest inspired candy jar.
Isn't it cute!? I want her to make me one!